Measure & Installation
How to measure
- Always use a metal tape measure.
- We require your measurements in millimetres.
- Measure width x height (do not reverse these).
- Measure every window
You can choose to have your blind made to fit the inside of the window frame or it can hang on the outside.
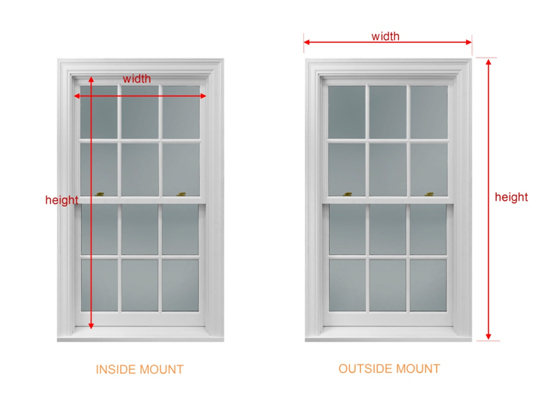
INSIDE MOUNT
- Measure the width from the inside of the window frame from left side to right side.
- Make sure to measure at the top of the reveal and not the bottom of the window, as this is where the brackets will be mounted.
- Measure the height from the top of the inside frame to the base of the inside sill or floor (if it’s sliding door)
- Measure height in 3 places – Left, Centre and Right and take the smallest of the three measurements ( vertical or panel glide blind)
OUTSIDE MOUNT
- Measure the width from the outer edge of the architrave to the opposite edge.
- Measure the height from the top of the architrave to where you want the blind to finish or floor(if it’s sliding door)
- Measure drop in 3 places – Left, Centre and Right and take the smallest of the three measurements (vertical or panel glide blind)
IMPORTANT NOTICE
- You have enough depth to mount the blind inside the frame. Less will result in the blind protruding out of the recess.
- When mounting your blinds into a corner window, one blind will run through and one blind will butt into the other blind.
- Do not make any deductions as our factory will do this to ensure a perfect fit.
- We only recommend that Roman Blinds are outside mounted.
How to install your blinds
CHECK LIST
Brackets need to be mounted onto a firm surface. If mounting to other surface you will need to provide special plugs or anchors shown in this chart.
Timber
Pre-drill holes and used the included screws
Concrete, Brick or Tile
Use a masonry drill and appropriate plugs, anchors and screws
Plaster
Use the Ramset 10mm Grip Hollow Wall Anchor and screw
You will require
- Cordless Drill or Screwdriver with Philips head bit
- Step ladder
ROLLER BLINDS
Outside Mount
The brackets need to be mounted flush with the top & outer edge of the architrave. If mounting to plaster & taking the blind past the window opening, mount the brackets to the required total width ordered.
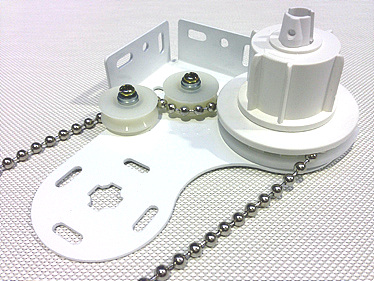
Inside Mount
Our factory has made a small deduction off the width to allow your blind to fit perfectly. This will eliminate the risk of the blind being a tight fit. Mount your Chain drive bracket first to the top of the inside window reveal, flush against the side then mount the Pin End Bracket.
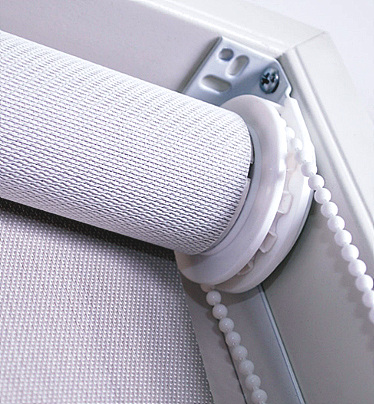
Mounting the Blind
- Place the Chain control end of the blind into the bracket by hooking the end into the cross section of the bracket and clicking it in a downward position.
- Raise the Pin end of the blind into the bracket compressing the pin until you hear it pop out and lock. Make sure the blind is securely in place before releasing.
- Use the clear ball chain stopper for inhibiting movement of ball chains between operative positions.
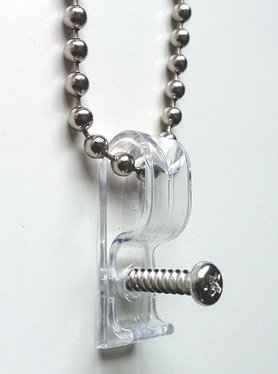
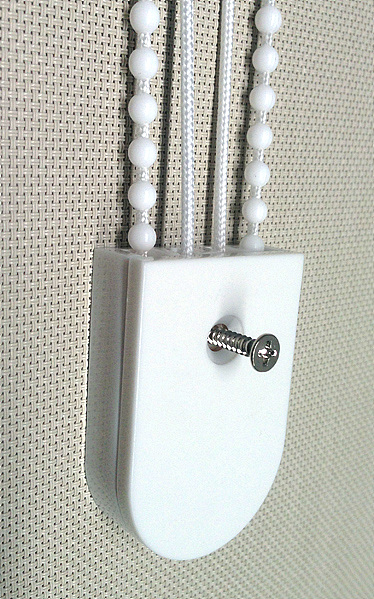
Child Safe Cord Tensioner
- It is a requirement by Australian Child Safety Laws that the cord tensioner by secured into place with the chain to prevent any risk of strangulation if the chain is lower than 1.6m off the floor.
- To fasten, hook the chain into the device and mount to the architrave or inside reveal.
- Mount the device slightly out of the way of the blind, so it does not interfere with the operation.
- The secured cord tensioner must allow the chain to have some slack but not be able to form a loop of more than 220mm if below 1.6m off the floor.
VERTICAL BLINDS
Bracket Positions
- Mark out the positions for the brackets at the desired even distance.
- If fitting the blind to the architraves (Outside Mount) and the track has an overhang that goes past the window frame, put the end brackets level with the edge of the architrave.
- Make sure to use the central screw hole on the bracket, this will then give you flexibility to adjust the blind up and down easily to the desired height, without having to reposition the screw.
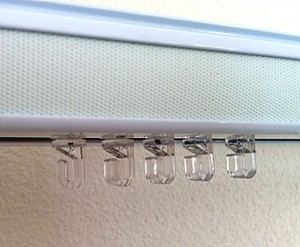
Hanging the Track
- Take the Vertical track and starting with the central bracket then end brackets.
- Hook the front of the track into the forward lip of the bracket. Make sure the track is centre to the window.
- Click the track into place by rotating the back of the track up into the rear of the bracket. You should hear it click into place. Repeat for each bracket.
Hanging the Slats
- Rotate track carriers, so the hooks face to one end of the track(open position).
- Spread the carriers out by drawing the cord or wand. Gently unroll slats and hook onto carriers working from one end of the track to the other. Do Not hang whilst carriers are rotated to the flush position to the track. This will cause the slats to not rotate and jam.
- For large blinds it helps to have a second person hold the track when attaching to the brackets. They can also help hand the slats to you when hanging on the track, as these can often be heavy. This will also ensure that you don’t drop and damage the track or slats.
Child Safe Cord Tensioner
- It is a requirement by Australian Child Safety Laws that the cord tensioner by secured into place with the chain to prevent any risk of strangulation if the chain is lower than 1.6m off the floor.
- To fasten, hook the chain into the device and mount to the architrave or inside reveal. Mount the device slightly out of the way of the blind, so it does not interfere with the operation.
- The secured cord tensioner must allow the chain to have some slack but not be able to form a loop of more than 220mm if below 1.6m off the floor.


ROMAN & PANEL GLIDE BLINDS
For the installation details, please contact us.